Showing posts with label indian spices. Show all posts

13 September 2009

JB special: Butter chicken

14 September 2009
Now I've loved butter chicken for as long as I've loved chicken. But I've had two problems with the restaurant butter chicken -- whether in India or in Melbourne -- I've had. 1) It always leaves me feeling really bloated 2) all the ghee/butter and cream gives me nasty gas.
Forced by my gastronomic disabilities -- love butter chicken, don't want to fart (!) -- I experimented... successfully. Now there are at least five different ways of making butter chicken and a basic e-search will give you those recipes. After trying most of them, this is a version of the butter chicken I've come up with.
What's so special about it? It uses roughly 2 tablespoons of oil, has the authentic taste and does not use any milk products -- butter, cream or yoghurt -- in it. I can hear the puritans yelling, "That's not butter chicken." But hey, try my version, you won't regret it. However, I cannot call it completely fat-free since the cashew nut paste is somewhat fatty. But bloody tasty. :)

Serves: 4-6
Prep time: 20 minutes (includes marination)
Cooking time: 30 minutes, on low heat, covered
Try this with: Steamed rice, bread or roti/ chapati
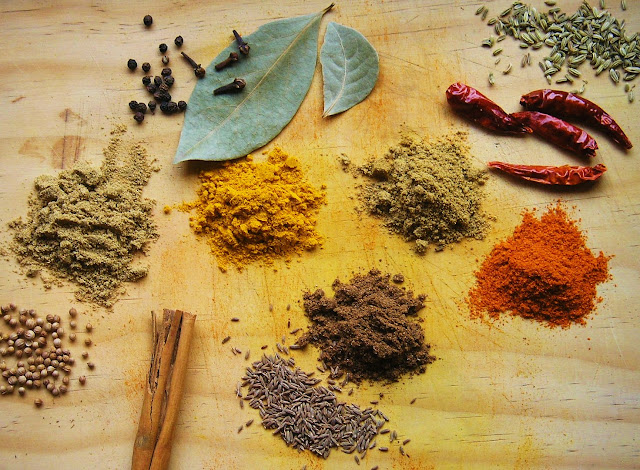
INGREDIENTS

For marinade:
Breast or thigh fillets 500 g (cut into cubes)
Salt 1 TSP, heaped
Chilli powder 1 TSP
Ginger paste 1/2 TSP
Garlic paste 1/2 TSP
Vegetable/Canola oil 1 TSP (of 2 TBS)
Turmeric powder 1 TSP, heaped
Coriander powder 1 TSP, heaped

For the sauce:

Onions 2 medium or 1 large, blended
Tomatoes 2-3 medium, blended
Ginger paste 1/2 TSP
Garlic paste 1/2 TSP
Coriander powder 1/2 TSP
Turmeric 1/2 TSP
Fresh coriander 2 TBS, blended
Tomato ketchup 1 TBS
Cashew nuts 100 gms, blended
Water (if needed)

NOTES

  1. The chilli powder is optional, the dish tastes just as good without it.
  2. The flavour of your butter chicken depends a lot on the tomatoes used: Select ripe tomatoes else the dish can turn out sour.
  3. Butter chicken is lightly salted and is somewhat sweetish; don't go adding too much salt.
  4. For those who like their butter chicken to taste extra buttery, add 1/4 cup cream with the cashew nut paste.
  5. You don't need to add any additional salt, cashew nuts release a natural sweetener that works just fine. However, if the tomatoes are too sour, chuck in a teaspoon of sugar or adjust according to taste.
  6. As always, before you put the pan on fire, prepare your indredients first... I've had a rather smokey kitchen because I'm looking for something while the oil burns in the pan.
  7. If you have one blender jar -- as I do -- and don't want to go washing after each session, follow this order: Puree cashew nuts first, followed by onions and lastly the tomatoes.
  8. While blending, do not add any extra water.

METHOD

  1. Mix the teaspoon oil, turmeric, coriander powder, chilli powder, salt and ginger-garlic paste together. Rub it on the chicken pieces -- should coat every piece -- and let the chicken sit for 20 minutes. (Use this to prepare the other ingredients)
  2. Blend the onions, tomatoes and cashew nuts -- separately please -- and keep aside.
  3. Heat remaining oil in a pan. Once its smoking hot, add the marinated chicken pieces and stir fry on high heat for 5 minutes or till all chicken pieces turn 'white'. Use a slotted spoon -- leaves the oil in the pan -- to pick out the chicken and keep aside on a plate.
  4. Reduce heat to medium and in the same pan, add the onion paste. Fry till it dries out and starts turning golden.
  5. Reduce heat to minimum and add the ginger and garlic pastes. Stir fry for 3 minutes.
  6. Raise the heat to medium -- sorry, all this heat up-down is only till this step, promise -- add the blended tomatoes and cook, stirring intermittently, till the sauce dries out a little.
  7. Reduce heat to minimum, mix in the tomato ketchup, stir fry for 2 minutes.
  8. Add the cashew nut paste and blended coriander; mix well.
  9. Add the pre-fried chicken pieces and mix so that all pieces coated with the sauce.
  10. Add sugar/salt according your taste IF needed.
  11. How does the gravy look? Depending on the tomatoes used -- ripe ones have more water content -- and how well you've followed the recipe, you shouldn't need to add any water. However, if the gravy looks too dry, add 1/2 - 1 cup water, mix in. Do remember that butter chicken gravy is never watery.
  12. Cover and allow to simmer for 10 minutes or till chicken pieces are tender.
  13. Garnish with fresh coriander leaves, roasted cashew nuts or cream 'squiggles' (as in pic) and serve hot with rice or roti.

Try it!!! And let me know how it turns out. :) If you have a different or better recipe for butter chicken, please do share. Will be happy to put it up here (attributed to you) or to link to your website. Share the love, share the recipes!

12 March 2009

JB Special: Lamb curry

13. 3. 2009

As I had written in my earlier post – Love and the holi mess – Partner and I went for a dinner to this nice couple’s home last night. Partner had told me that the boys had decided it would be a curry-cook-off between the ladies. Our hostess had made really nice butter chicken and I had made the JB-special lamb curry. You can read about what happened at the dinner here.

Here’s the recipe for the lamb curry; it takes patience with this one, but the effort is bloody well worth it.

JB’S LAMB CURRY
Serves: 4
Cooked on: Covered on low heat, 1 hour 30 minutes or till lamb is very tender
Accompaniment: Raita or fresh cucumber-onion salad with a dash of fresh lime
Try this with: Roti or naan

NOTES:


  1. How to puree tomatoes: Boil water in a saucepan; put the tomatoes in the boiling water and cook covered for 5 minutes. Remove from the gas and let the tomatoes sit in the water (still covered) for another 5 minutes. Remove the lid and you should see cracks on the tomato skins. Drain the hot water, hold tomatoes – careful, these will be hot – under running cold water/ in a bowl of cold water and peel off the skins. Put the skinless tomatoes in your mixer/blender and run the motor for 2 minutes or till tomatoes are pureed. Done!
  2. You can also try this with beef or goat meat. If your family/guests don’t mind bones, choose meat with bones; preferably from the hindquarters. Those who have better suggestions when buying meat, please do share.
  3. This recipe takes patience. While the cooking part is not tough, it tastes best when you let the lamb cook over low heat. The first stage involves allowing the juices of the lamb to dry out. The second stage involves adding water, covering the lamb and letting it cook till the water evaporates and the meat is tender.
  4. If you prefer a drier curry – tastes better with roti/naan/bread – cook for longer to let the water dry out completely. For those who prefer some gravy, let some water remain.
  5. The coriander is a must as I find it adds a particular flavour to the dish. The coriander needs to be added in two stages; majority of it while cooking and then just enough for garnishing before serving.
  6. It can be quite irritating biting into the cardamom when eating or worse, chewing on the whole red chilli. Therefore it is prudent to pick out the cardamoms and whole red chilli before laying the dish out on the table.
  7. Save yourself trouble and buy the roti/ naan from an Indian restaurant/ dhaba.


INGREDIENTS


Lamb steak: 900 gm, with some fat, cut into small cubes
Mustard oil/ ghee/ vegetable oil: 3 TBS
Onions: 2 large, finely chopped
Tomatoes: 4 medium, pureed
Coriander: 4-5 TBS, washed and finely chopped
Bay leaves: 3
Big cardamom: 2, slightly crushed
Whole black pepper: 5
Fenugreek seeds: ½ TSP
Whole red chilli: 1-2
Garlic paste: 2 TSP
Ginger paste: 1 TSP
White vinegar: 2 TBS
Coriander ground: 2 TSP, heaped
Turmeric ground: 1 TSP, heaped
Cumin ground: 1 TSP, heaped
Garam masala: 1 TSP, heaped
Red chilli ground: 2 TSP, heaped
Salt: to taste
Water: 1-2 cups, as desired


METHOD


  1. Heat the oil in a deep wok/pan on high heat. Once the oil smokes, reduce heat and add the bay leaves, cardamom, whole black pepper, whole red chilli and fenugreek seeds. Cook for 1 minute.
  2. Next add the finely chopped onions and fry them till the onions turn pinkish. Now add the ginger-garlic pastes and cook mixing well till the onions-ginger-garlic turn golden. Take care not to burn the onions.
  3. Add turmeric, ground coriander, ground cumin, red chilli powder, salt and the vinegar and cook, mixing the spices well. Cook for about 5-6 minutes till spice mixture gives off a ‘cooked’ aroma and the vinegar dries out. Keep stirring so that the spice mixture does not stick to the bottom of the pan/wok.
  4. Add the lamb pieces and mix well to cover all the pieces with the spice-in-vinegar mixture. Cook for about 10 minutes so that all lamb pieces are coated and start turning brown.
  5. Add the tomato puree, mix well with the lamb and spices, raise the heat to medium and allow the lamb to cook till it starts releasing water. This takes about 10-15 minutes and you will need to keep stirring the lamb so that it does not burn and stick to the bottom of the pan. Also keep in mind to scrape the spice mix off the sides of the pan while you stir.
  6. Reduce heat now and let the water – the tomato puree will also release water – to dry off. Remember to keep stirring and turning the lamb pieces in the pan so that all pieces get cooked evenly.
  7. Once the lamb-tomato-spice mix dries – the sign is when the liquid in the pan is visibly reduced, the masala/spice mix starts sticking to the pan and is not easily scraped off – add 2 cups of water and cover the pan.
  8. Add the coriander - keeping some for garnishing - and cook for half and hour or more – stirring and mixing intermittently – till the lamb is really tender and the water has almost dried out. If the water has evaporated and the lamb is still somewhat tough – should not happen but if it does – add another half cup water, cover and cook some more.
  9. The best way to check if the lamb is tender enough is to pick out a piece with a fork and bite into it! Vary the water amount depending on how much gravy you want: If you want more gravy, add another cup of water, mix well, raise the heat to medium, bring to a boil then reduce heat and simmer for 5 minutes. Remember that the gravy should not be overly-watery.
  10. Once the meat is tender and you have your desired amount of gravy, turn off the gas, and transfer the lamb curry to a serving dish, garnish with chopped coriander.
Serve with roti / naan or even bread and you’re done!

04 March 2009

Ghoogni/ ghugni (Sautéed green peas salad with Bengali five spices)

5. 3. 2009

This dish used to be a Thursday ‘fast’ special. Papa used to (still does) fast on Thursdays, which means he skipped breakfast and a proper lunch. Mamma used to make ghoogni for him and we joined in as well. I think most families from Bengal and Bihar – neighbouring states, they have a lot of food and cooking in common – have fond memories of ghoogni.

The other day a college mate in New York – we were ‘speaking’ after nearly eight years! – mentioned reading my post on sandwiches in Australia. I had mentioned the ghoogni in passing in that post. “I wanted you to know this,” she said and proceeded to tell me that reading the post reminded her how much she loved ghooghni. She had called her mom back in India for the recipe and has since made the dish a number of times. I was quite touched. Ghoogni in New York and now ghoogni in Melbourne. Hah, culinary conquests I say!

I was trying to get a nutritional value chart or figures on green peas when to my greatest surprise I came across an Indian government website. Imagine my shock to learn that the Food and Nutrition Board, Ministry of Women and Child Development (Govt of India, 2008) has a website with Indian recipes and nutritional values attached. I really did not expect an Indian government website to think like that. The site also has a ghoogni recipe. While the website is not very eye-pleasing and the recipes are rather swiftly dealt with, here’s to the Indian government at least trying out new things. Check out the website. (Green pea nutrition chart --->)


Ghoogni/ ghugni (Sautéed green peas salad with Bengali five spices)
Serves: 2
Cooked on: Low heat
Accompanimen: A dash of lime juice along with a steaming cup of tea or soup!
Try this with: Soft, white bread or puris

NOTES

  1. This is a rather quick and very versatile dish that can be happily modified to suit your taste. With or without spices, the green peas make for healthy eating. There is a Bengali version of the recipe as well as one that comes from Bihar. Some also like making this with minced meat, but we are sticking to the vegetarian version. I shall be making my version!
  2. It can be made using either green peas (fresh or frozen) or chickpeas. If using frozen green peas, do thaw them (naturally or in the microwave); for using chickpeas it’s a good idea to soak them overnight. I prefer making ghooghni with green peas.
  3. Today’s recipe only uses green peas, you can add numerous other vegies as well. While technically it won’t be ghooghni; it will make for a darned tasty dish. Just remember that everything has to be finely chopped/diced.
  4. Vegies that go very well with this dish: Baby carrots, corn (steam them first), baby corn, button mushrooms and potatoes. If you wish to use other vegies, feel free; just remember not to overpower the flavour of the green peas.
  5. I prefer my ghooghni to be somewhat sweet-n-spicy; however, you can skip the garam masala and simply stick with salt and pepper. It still tastes good! Butter your bread and pile it up with ghooghni or have a bowlful with a steaming cup of chai or even your favourite soup.
  6. Also, chai in India means tea and not the just the full-of-spice tea that you get in jars in Australia.

INGREDIENTS
Vegetable/canola/olive oil: 1 TBS
Peas: 2 cups, fresh or frozen (thawed)
Onion: 1 big, finely chopped
Ginger: 1 TBS, skin removed and finely grated
Tomato: 2 medium, finely diced
Fennel: 2 TSP (optional)
Red chilli ground: 1 TSP (optional)
Dry mango powder/ amchoor: ½ TSP (optional) OR
Sugar: 1 TSP
Salt: to taste
Black pepper: 1 TSP
Garam masala: 1 TSP (optional)
Lemon juice: 1 TBS (optional)

METHOD

  1. Heat oil in a wok/pan with lid. Once the oil is hot, add the fennel seeds and allow to splutter. The fennel is optional; you can skip it.
  2. Once the fennel splutters, add the onions and fry them till they turn slightly pink. Now add the grated ginger and fry for 3 minutes.
  3. Next add the salt, pepper, red chilli powder and garam masala and fry for another 3 minutes till the onions are coated with the spice mixture.
  4. Add the tomatoes and fry till the tomatoes – mashing them with the spatula – till the tomatoes soften and are pulverised.
  5. Fry the mix for 3-4 minutes till the spices start sticking to the bottom of the wok/pan (but can be easily scraped off). This is your sign that the masala (spice mix) is cooked.
  6. Finally add the green peas and cook for another 3 minutes till the peas get a ‘shine’ on them.
  7. Sprinkle a little water, cover the wok/pan and cook for 5 minutes. Remove the lid, sprinkle the amchoor or sugar and fry for 3 minutes.

You’re done! Squeeze some lemon juice and you’re ready to go.
Want to know more about your peas? Here’s where you go.

24 February 2009

Shorsher maach (Fish in mustard-green chilli paste)

25.3.2009
This is a dish that has been included in traditional Bengali birthday menus, when guests have been over, or as special Sunday lunches or any other occasion that demanded it. Once I started living away from my parents – since 2000 – this was also a MUST each time I visited home.

It was also the cause of much heartburn between my parents (and not due to the spices). Mamma had grown away from Nani and any cooking Mamma learnt was by trial and error after she was married. Now when my parents were married in 1978, they did not have a mixer (blenders were science fiction).
Mamma had to make the mustard-chilli paste on a sil-noda (stone grinder, called sil-batta in Hindi). It was tough work and at times the paste wouldn’t be as fine, which directly resulted in the flavour of the dish. Papa would end up comparing Mamma’s cooking to his mother’s cooking and well, comparisons with one’s mother-in-law is never a good thing in Indian households. Men!!

Funny though, the same man – as the husband – found faults and yet as the father thinks his daughter the most brilliant cook (smiles, shakes head). Men!!! Thankfully, my Partner is non-Indian (wicked grin) and anyway I leave most Australian cooking to him (wickeder grin). I still suck at salads though. Shrug.
As far as I am concerned, shorsher maach that is not jhaal (hot) is not the real thing. Then again, the jhaal has to be a right blend of the tanginess of the mustard and the zing of the green chillies. Neither should be overpowering and the idea is to give you “Ooof!” rather than make you cry. This is what we had for dinner last night and I hope you enjoy it too.
PS: Don’t have Coke with the meal, it makes your throat itchy. Discovered last night.
Did you know? The earlier Mexicans used something quite similar to the sil-noda, it was called a ‘metate y mano’. Check it out here.

Shorsher maach (Fish in mustard-green chilli paste)
Serves: 2-4
Cooked on: Deep fried then over low heat
Accompaniment: freshly cut onion slices, sprinkled with lemon juice and salt
Try this with: Steamed long-grain rice (Basmati works best)


NOTES:

  1. Mustard oil is a must as it adds to the flavour of the mustard. However, you can use canola or other vegetable oil.
  2. Try buying fish with an outer skin – Australian markets usually have skinless-fillets – as the crisp, fried fish skin adds to the flavour. If buying fillets, the thicker the fillet, the better. If you can get a whole, cleaned fish and cut it yourself, you’ll get the perfect pieces. Today we will cook this with fillets; perhaps will show how to cut the fish into ‘traditional’ pieces some other time.
  3. Rohu (greas carp, Labeas rohita) and hilsa/ilish (Hilsa shad, Tenualosa ilisha) are ideal for this. Since both types are predominant in the Indian subcontinent, I am using any fish with thick fillets; today’s choice are ling (Genypterus spp) skinned fillets.
  4. For those who cannot tolerate hot food; skip the green chillies completely. Be warned though, it’s not half as much fun without the chilli.
  5. Marinate the fish in the turmeric-salt mixture before you start preparing the mustard paste; the longer the fish soaks in the mixture, the better it tastes upon frying.
  6. While frying the fish, remember do NOT poke around with the fish, let it fry in peace. Basically, let one side fry thoroughly and only then turn it over to the other side. Fiddling with the fish when it’s not properly fried will lead to the fish breaking.
  7. Also mind your hand when frying the fish, the oil really splutters. Keep the oil really hot (keep on high flame). Do NOT chuck fish into the oil as (common sense tells you that) the hot oil will spill all over.
  8. Use a perforated spoon to pick fish out of oil so that extra oil drains back into the pan/wok.
  9. Use a different pan/wok to make the curry and not in the same one you’ve used for frying. Once you finish frying the fish and transfer the oil to a clean wok/pan; soak the frying pan/wok in water…it’s tough cleaning when dried out.
  10. Try not to eat the fried fish. Heh, I’ve done that many times. Also, the fried fish by itself – served with Maggi hot ‘n’ sweet sauce or any spicy chutney that you like – makes for a great party snack. Serve with onion slices sprinkled with lemon juice and some salt.
INGREDIENTS:

Ling skinned fillets: 980 gms (used here, change accordingly)Mustard seeds: 3-4 TBS
Green chili: 5 big; one finely sliced, four used in the paste
Turmeric ground: 2 TSP
Red chilli ground: 2 TSP
Salt: to marinate and according to taste
Nigella/kalaunji/black cumin: ½ TSP or a pinch

METHOD:
  1. Evenly sprinkle 1 TSP turmeric powder, 1 TSP red chilli powder and 1 TSP salt on all the fish fillets (I had eight) and rub them on the fish. Cover and keep aside. ---->
  2. In a blender, take ½ cup water, four green chillies, ½ TSP salt and all the mustard seeds and grind into a fine paste. (Run motor for 3 minutes or so). The end result should be a fine, frothy paste. Sieve through a muslin cloth/strainer into a bowl, discard the seeds, add ½ cup water to the mustard-paste-juice and keep aside.
  3. In another small bowl/cup, mix 1 TSP red chilli powder and 1 TSP turmeric powder with 3 TBS water. Keep aside.

4. Heat oil in a deep-bottomed pan/wok on high heat the oil starts to smoke. Reduce the heat and in batches – as many pieces fit into the pan/ wok without overcrowding – fry the fish pieces till each side is browned and crisp. Once all pieces are fried, cover them and keep aside.

  1. 5. Drain the oil – careful it’s going to be bloody hot – into another pan/wok and keep heat at medium. As the oil starts to smoke – should happen quickly as the oil’s still pretty hot -- add the nigella seeds.
    6. As soon as the nigella splutters, add the red chilli-turmeric paste and fry, stirring constantly for 5 minutes.
    7. Now add the fried fish pieces, one at a time and let each side of the fish cook for about 1-2 minutes before adding the next piece. The idea is to allow all the pieces to be coated with the chilli-turmeric paste.
    8. Once all pieces are coated as above, add the diluted mustard paste along with the thinly sliced green chillies, add another ½ cup water, turn the stove flame to high and bring to a boil.
    9. Once the broth boils, reduce heat to low/minimum and simmer till gravy thickens. Do not cover and remember to turn the fish – might be twice-thrice depending on how long it takes to dry out – while the gravy thickens.
    10. Serve hot with steamed basmati rice. You could squeeze some lemon juice on it as well. Best eaten with hands and licking your fingers is acceptable etiquette.

Confused about your fishes? Try this…

22 February 2009

Aloo-begun (Potatoes and eggplant with fennel)

23 February 2009
Someone once told me that eggplant/ brinjal is called begun in Bangla (baingan in Hindi) because it lacks any gun or good qualities. I don’t know if it’s an old wives tale or if there’s any truth to it. According to this website though, eggplants are recommended for those interested in losing weight! That’s a bit of a surprise because the two ways that I really like my eggplants – deep-fried or in lamb moussaka – are both loaded with fat. Then there’s this blog that suggests that perhaps the veggie loses its value when cooked. Whatever be the case, I quite enjoy my begun.

This dish was/is one of Papa’s favourites and one of the few times he enjoyed a parantha. Papa has always been more of a chapatti man. Mamma used to make this as Sunday brunch, usually along with thick-gravied chicken/meat as the non-vegetarian dish for the day. While growing up, the only way I liked my eggplant was as begun bhaaja (thick slices of eggplant, deep fried). I never appreciated the sheer magic of this simple dish. Surprisingly now, it’s one of my favourites.

I was quite surprised to discover that eggplant is quite a staple in Australia. Folks even have grilled eggplant in their sandwiches, though I daresay am not exactly partial to begun in my sandwich. You can call it a mental block or cultural difference.

I’ve shared this particular recipe with a lady here – Partner’s school friend’s wife – and she loved it. Recently she told me she cooked it for her in-laws and they loved it too. Being ever sceptical of compliments, I had politely smiled when she’d given me the feedback. However, I was duly chastised later when I happened to bump into her sister-in-law who mentioned that she had tasted one of my recipes and had completely loved it. Moral of the story: Cynicism is not healthy when cooking eggplants.

Note to self: Call Mamma and thank her… Thanks Mamma!

Aloo-begun (Potatoes and eggplant with fennel)
Serves: 2
Cooked on: Low heat in covered pan/wok
Accompaniment: Salad of your choice
Try this with: Paranthas


INGREDIENTS:
Mustard oil (preferred) or canola (any vegetable) oil: 1 TBS
Fennel seeds: 2 TBS
Potatoes, old*: 2 big, peeled and diced
Brinjal/ aubergine/ egg plant: 2 big (6-8 long ones), diced
Green chilli: 1-2, optional
Salt: to taste
Turmeric ground: 1 heaped TSP
Coriander ground: 1 heaped TSP
Red chilli ground: 1 level TSP (or as hot as you want)
Sugar: 1 TSP
Ginger: 1”, grated
Water: 2 TBS
Coriander: fresh, enough to garnish, optional

TBS = tablespoon; TSP = teaspoon

NOTE:
  1. Brinjal cooks faster than potatoes; therefore use older potatoes as they cook faster than tougher, new ones.
  2. Brinjal and potatoes turn black when left in open air. Cut vegies right before you start cooking. To prevent potatoes from turning black, keep diced potatoes soaked in a bowl of water with 1 TSP salt in it. Drain water when cooking.
  3. While both potatoes and brinjal are diced, the potatoes will be diced slightly smaller than the brinjal. The texture of both vegetables is different; therefore cooking times are different. In order to prevent either your brinjal overcooking or potatoes remaining undercooked, please ensure you cut them as mentioned.
  4. Always keep your spices, salt etc handy so that you’re not opening-closing cupboards to find them.
  5. The vegies in this dish are cooked mainly by steaming so you will need a wok/ deep frying pan with a tight-fitting lid.
  6. Please wear an apron! If you are anything like me, the potatoes will have a tendency of (in)frequently flying out of the pan and landing on your tee shirt. Turmeric splatters are tough to remove from clothes.

METHOD:

  1. Heat the (mustard) oil in the deep frying pan on low heat till it starts smoking (keep your exhaust on).
  2. Once oil smokes, add the fennel seeds; they should start spluttering in a minute.
  3. Now add the potatoes and sauté for 5-7 minutes. You’ll need to mix the potatoes and fennel so that the fennel does not burn (horrid taste) or the spuds don’t stick to the bottom of the pan.
  4. Once potatoes turn slightly golden, add the brinjal/eggplant. Mix well so that both potatoes and brinjal are coated with the fennel seeds. Again, ensure fennel does not turn black. Cook for 5-7 minutes, mixing intermittently.
  5. Once brinjal turns brown, add salt, turmeric, red chilli and ground coriander and mix well so that vegies are well-coated with spice mixture. Increase heat to medium and cook open for 3 minutes, mixing well. Reduce heat to low, cover the pan and cook covered for another 5 minutes.
  6. Remove lid, mix vegies again, sprinkle the sugar and mix well for another 2 minutes. You will notice that spice mixture begins to start sticking to the bottom of the pan. Add 2 TBS water, grated ginger, mix well and cover the pan. Cook for 8 minutes.
  7. At the end of cooking time, the vegies should be giving off a brilliant spuddy-fennelly (oh well) aroma. Uncover the pan and check the potatoes with a fork. If they break/can be cut easily with a fork, your vegies are ready. If not, mix well, sprinkle a little more water – do not drown the vegies! – and cook covered for another 5 minutes or till done. Usually you don’t need the second round of covered cooking.
  8. Finally, remove lid and cook open for another 2 minutes, scraping off the caramelised spices at the bottom of the pan and mix well with the vegies.
  9. Turn off the gas and allow to cool slightly while covered. Transfer to serving dish, garnish with coriander and serve with paranthas/puris.

We’re done!
PS: If you do try this, please let me know how it turns out and if you liked the dish.

20 February 2009

Ingredients for a tummyful of love

20 February 2009
Pic = Jhoomur Bose
Have I ever told you -- am assuming some people are here from my other blog Eve Emancipation -- that I don't like cooking for myself? However, when it comes to feeding people, I can do it any time. It's a little surprising since of the three major cooking influences in my life, two do it (cooking) because they have to.

While growing up, I have completely loved the food that my Ma and my Nani (maternal grandma) have cooked. Both make different things -- Nani is more traditional, Ma is an expert in Chinese -- and both have very different cooking styles. Both these ladies cooked to feed their families and Ma has been known to declare that she quite hates cooking.

Ma's problem was having to think up of WHAT to cook on a daily basis. I guess it can get tedious when you have two growing kids, a husband who does not help in the kitchen and yet insists on a five course meal. And of course, home-delivery wasn't such a big thing then. However, despite her lack of enthusiasm, Ma was a true-blue Army wife from the older generation. She made Papa happy with her food and she could cook up some exotic things when they had brigade commanders and GOC (General Officer Commanding) coming over for dinner at our house.

However, the one person who has made the most impression on me -- both food-wise and as a person -- is my mother's aunt. We call her 'Pimmi'. That is not her name and in fact I don't even know her real name, but in the true tradition of Bengali nicknames, she is Pimmi to everyone. She was Pimmi to Ma, to me and I daresay those who will come after us. There was always a great level of enthusiasm whenever we went visiting her and family on Sundays. Pimmi made the MOST awesome mangshor jhol (mutton curry)... perfectly succulent meat, with big, chunky potatoes and really spicy! The highlight for me though was being hand-fed. My brother was too small and little shit never got to taste that, hah.

So either Pimmi or her daughter Pinkidiwould make me sit on the table and would make huge balls of the rice-mixed-with-curry and feed me. It was sheer, sheer bliss. I can still smell the mangsho. As I grew up, I took to standing in her kitchen, plate in hand, waiting to be the first one to eat. The last that I visited them in 2003 -- I was 24 -- and Pinkidi fed me again. There was so much love that went into the cooking and then the obvious pleasure in feeding others... I will never forget that. When I cook, I try to be the same.

I guess offering to feed people by hand will startle most -- especially here in Australia, they'd insist on gloves -- so I stick to pouring my heart out in my food. Most people who've had my food have liked it. I am grateful to my friends who came home because "Jhoomur is cooking." In my single days, I fed bands of boys. (smiles) They kept me sane.

The recipes I will share here will be tried and tested. Most will be Indian food and from recipes I've gleaned from my mother and others. There will also be recipes from world cuisine as well and from books and websites. Those will be duly credited. Some will have stories to go with them, others strictly recipes. We shall see as we grow along. So here we go...

Before I start posting any recipes, there are a few things you will need to cook food, JB-style. Some I know the Hindi names for, others I don't. Please feel free to correct or add. As long as you have a basic wok/ kadhai (with a lid) and a saucepan with a lid, we shall be fine. However, these are the ingredients I simply cannot cook without:

Whole spices
Cumin seeds: jeera
Coriander seeds: dhania
Mustard seeds: sarson
Fenugreek seeds: methi
Black cardamom: badi ilaichi
Cloves: laung
Black peppercorns: kali mirch
Bay leaves: tej patta
Dried, red chili: sabut lal mirch
Cinnamon stick: dal chini
Poppy seeds: khus-khus

Ground spices
Cumin ground/ powder
Coriander ground/ powder
Garam masala: mixed spices, available as ‘garam masala’ in stores
Red chilli powder
Turmeric ground/ powder
Black pepper ground
Salt: let’s not forget that!

Notes and other important things:

1. Have a standard teaspoon and tablespoon ready
2. Wooden spoon/ spatula for cooking in non-stick ware
3. Dish-cloths (4), one for wiping your cooking bench, one only for wiping your hand, one for wiping spoon(s) and another for drying dishes
4. Chopping board, whether plastic or wood, you need one
5. Knives, one for your veges and one only for meats; I have more for specific purposes; we shall add along as we cook
6. Plastic bags to throw in peels and other refuse
7. Dustpan and small broom; I am very messy and find it handy to have these ready when I manage to spill stuff (which is regularly)
8. Someone to do the cleaning up after you. Bwahahaha, kidding! But if you can, it's smart to have an arrangement where you cook and someone else cleans. (evil grin)